動作環境
XCode 6.2
Google Mobile Ads SDK 7.2.2
AdMobの準備
広告を表示する前にアカウントの作成など準備を済ませておきましょう。
アカウントは下記リンクから作成できます。AdSenseとAdWordsのアカウントが必要ですが、なくてもすぐに作成できます。
次に広告を作成を行います。
広告はアプリごとに管理するので最初に「新しいアプリを収益化」ボタンで管理アプリの作成を行います。
次に「収益化」タブの左メニューから先ほど作成したアプリを選択して「新しい広告ユニット」ボタンで広告を作成します。
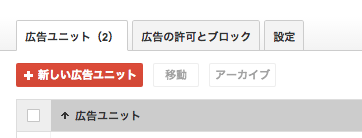
現在は「バナー」と「インタースティシャル」の2種類から選択することができます。
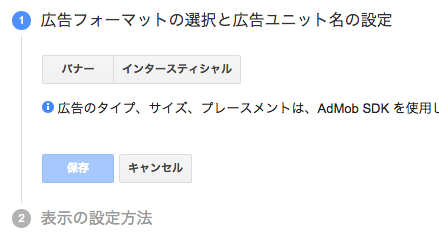
作成後にできた「広告ユニット ID」は後でコードに貼るのでコピーしておきます。
SDKのダウンロード & インストール
広告を組み込むにあたりSDKをダウンロードします。
下記リンクからPlatform iOS の「googlemobileadssdkios.zip」からダウンロードします。
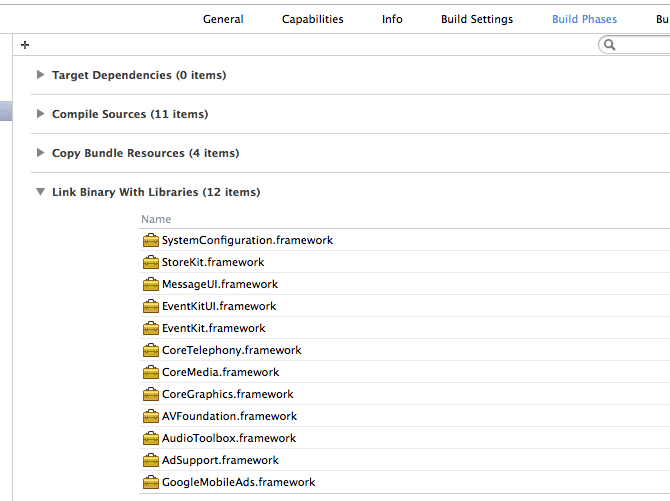
プロジェクト設定画面で「TARGETS」→「プロジェクト名」を選択。
「Build Phases」タブの「Link Binary With Libraries」にダウンロードした「GoogleMobileAds.framework」をドラッグして追加します。
組み込みフレームワークとして下記が必要なので追加します。
- AdSupport
- AudioToolbox
- AVFoundation
- CoreGraphics
- CoreMedia
- CoreTelephony
- EventKit
- EventKitUI
- MessageUI
- StoreKit
- SystemConfiguration
バナーの表示
準備ができたのでバナーから表示してみます。
例えば「UIViewController」に表示するには下記のようにします。
import UIKitimport GoogleMobileAds
class TestControllerView: UIViewController, GADBannerViewDelegate { override func viewDidLoad() { super.viewDidLoad()
let bannerView:GADBannerView = GADBannerView(adSize: kGADAdSizeSmartBannerPortrait) bannerView.adUnitID = "ca-app-pub-xxxxxxxxxxxxxxxxxxxxxxxx" bannerView.delegate = self bannerView.rootViewController = self let gadRequest:GADRequest = GADRequest() gadRequest.testDevices = [kGADSimulatorID] // テスト時のみ bannerView.loadRequest(gadRequest) self.view.addSubview(bannerView) }}「gadRequest.testDevices」を指定するとテスト用のバナーが表示されるので公開時に削除します。
初期化時(GADBannerView)にバナーサイズを定数で指定します。
| サイズ(幅×高さ) | 説明 | 対応 | 広告サイズの定数値 |
|---|---|---|---|
| 320x50 | 標準のバナー | 携帯電話とタブレット | BANNER |
| 320x100 | バナー大 | 携帯電話とタブレット | LARGE_BANNER |
| 300x250 | IAB レクタングル(中) | 携帯電話とタブレット | MEDIUM_RECTANGLE |
| 468x60 | IAB フルサイズ バナー | タブレット | FULL_BANNER |
| 728x90 | IAB ビッグバナー | タブレット | LEADERBOARD |
| 可変バナー | スマート バナー | 携帯電話とタブレット | SMART_BANNER |
参照元: バナー 2 - Google Mobile Ads SDK — Google Developers
インタースティシャルの表示
インタースティシャルは全画面に表示される広告です。
ボタンを押すと広告が表示されるようにしてみましょう。
import UIKitimport GoogleMobileAds
class TestControllerView: UIViewController, GADInterstitialDelegate {
var _interstitial: GADInterstitial?
override func viewDidLoad() { super.viewDidLoad()
_interstitial = createAndLoadInterstitial()
//ボタン作成 let adButton = UIButton() adButton.frame = CGRectMake(0, 0, 100, 60) adButton.setTitle("ad", forState: .Normal) adButton.addTarget(self, action: "presentInterstitial:", forControlEvents: .TouchUpInside) self.view.addSubview(adButton)
} func createAndLoadInterstitial()->GADInterstitial { let interstitial = GADInterstitial(adUnitID: "ca-app-pub-xxxxxxxxxxxxxxxxxxxxxx") interstitial?.delegate = self let gadRequest:GADRequest = GADRequest() gadRequest.testDevices = [kGADSimulatorID] // テスト時のみ interstitial?.loadRequest(gadRequest)
return interstitial! }
func presentInterstitial(sender:UIButton!) { if let isReady = _interstitial?.isReady { _interstitial?.presentFromRootViewController(self) } }}インタースティシャルは初期化時(GADInterstitial)に「adUnitID」を指定しないといけないようです。
※「gadRequest.testDevices」を指定するとテスト用のバナーが表示されるので公開時に削除します。
インタースティシャルを閉じたときの動作
インタースティシャルを閉じたときに画面遷移などの動作をさせたいときは「interstitialDidDismissScreen」に書きましょう。
func interstitialDidDismissScreen(ad: GADInterstitial!) { // start()}バージョンによって聞か方が変わったりしますので注意してください。
7.2.1はValidationが通らなくてはまりました。